
This particular laptop is a Dell, but laptops are generally the same when it comes to replacing components.
Why did I replace the hard drive? Well, the operating system (Windows 7) was acting strange which is a sign of one of two things: 1) The software has corrupted and needs to be reinstalled, or 2) the hardware (hard drive, memory or motherboard) is failing and needs to replaced. As an IT guy, I have different tools I can use to diagnose an unhealthy computer. Most of these tools involve booting to a CD and running some sort of diagnostic test specific to an individual part in the machine. I tested the memory which passed fine, and then the hard drive, which failed. Now the hard drive was still working enough to recover the data saved on it, so that was a bonus. We opted to replace the hard drive for $100 instead of replacing the whole computer.
I've had good luck with Western Digital hard drives, so I purchased one from NewEgg (a great place for computer parts and accessories).
Let's get started!
Step 1: Gather Equipment
We'll need the following:
1) Container for screws so we don't loose them
2) A phillips screwdriver
3) A flat screwdriver
4) A new hard drive
5) A broken laptop

Step 2: The Basic components
Out of curiosity, you may be wondering what all these things are on the underside of your laptop, I labeled a few in the photo below. Go ahead, flip your laptop over and get familiar.

Step 3: Disconnect power source and remove the battery
Before working on any computer, always, disconnect the power source - this means removing the battery as well. Yes, there are some laptops with internal batteries that cannot be removed, we learn to deal with it.
A) Confirm laptop is shut down
B) Unplug power adapter
C) Push the release levers to unlock the battery (white arrows in photo)

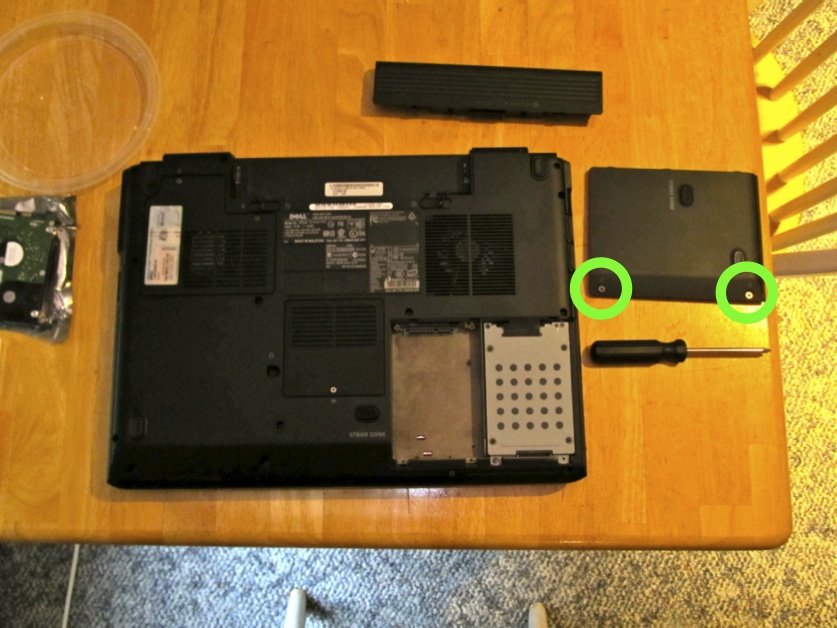
Step 4: Remove the hard drive cover
A) Use a screwdriver to remove the cover over the hard drive - screws are highlighted below in green.

B) Set the cover out of the way. (In some cases, the screws are attached to the cover - leave them attached or you won't be able to secure the cover later - see green circles below.)
C) You will notice this laptop actually has room for TWO hard drives but is only using one.
Step 5: Remove the hard drive caddy
A) Use a screwdriver to remove the screws for the hard drive caddy.

B) Remove the hard drive caddy. Depending the laptop, it may require you to separate the hard drive from the machine by pulling the caddy up or sliding it away from its connector. For this model, pull up on the black plastic tab once the screws are removed and safely place in our screw container.


Step 6: Remove failed hard drive from caddy, replace with new hard drive
A) Use a screwdriver to remove the screws holding the hard drive to the caddy.
B) Then taking note of which how the hard drive was positioned in the caddy, replace with the new hard drive.
C) Screw caddy to the hard drive, just snug, these are delicate electronics folks, no need to go all Hercules on them.

Step 7: Move the hard drive adapter from the old hard drive to the new drive
Often laptop hard drives will have some sort of adapter to connect the pins on the hard drive to the laptop's hard drive controller.
A) Carefully, use the flat screwdriver to separate the adapter from the old drive by "walking" it off - a little from each end, then install on the new hard drive. Try not to touch the gold pins with your fingers.

Step 8: Reassemble hard drive caddy (with new drive) in the laptop, return the hard drive cover, reinstall the battery.
Assembly is the opposite of disassembly - make sure you don't have any spare screws!

Step 9: Start your recovery process
In my case I reinstalled Windows 7 from the DVD, then copied the files from the damaged drive to the new system.
Best of luck. Posts coming soon: How to Recover Data from a Fail(ed/ing) Hard Drive and How to Upgrade the Memory in a Laptop
No comments:
Post a Comment